| How to FLY Google Earth Using GPS LOG FILES |
UPDATED June 14, 2015: I was surprised how easy it was to to load Google Earth with the Garmin database files and show the GPS tracks for the 2007 Alaska Trip. the GPS files are now packed in separate ZIP files for each TOUR. Use the SAVE TARGET AS command in Windows to download the files to a new folder on your computer hard drive. There is only ONE ZIP file with the entire Alaska flying trip in that single Garmin database (.gdb) file. Extract the file to your "flights" directory where you can store the Garmin database files. You will see the name of the file with the ".gdb" file extension. Use this same file folder to store more Garmin database files I will be providing soon. I will be modifying many web pages to point to these files as each Garmin GPS ground track file is posted. Yes, you will be able to fly anywhere I have saved a GPS database file as I get them loaded to this web site. This procedure will work on any personal computer that can run Google Earth.
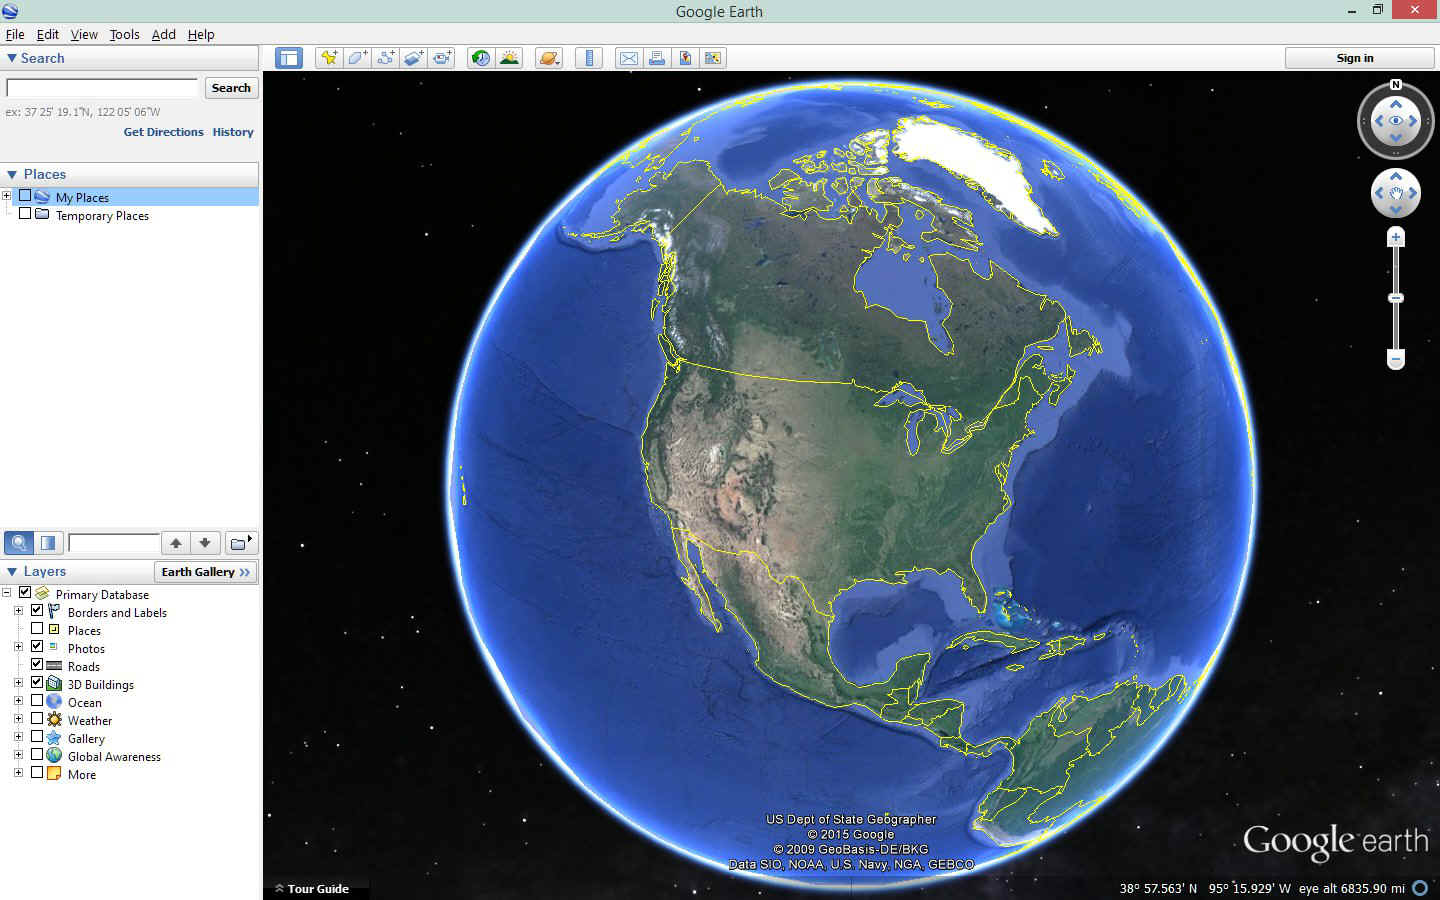
Here is the way my options are set when I run Google Earth with no Garmin data
base files loaded. I have hidden My Places by unchecking the box in the Sidebar at
the left of the window, then collapsing the entries under My Places.
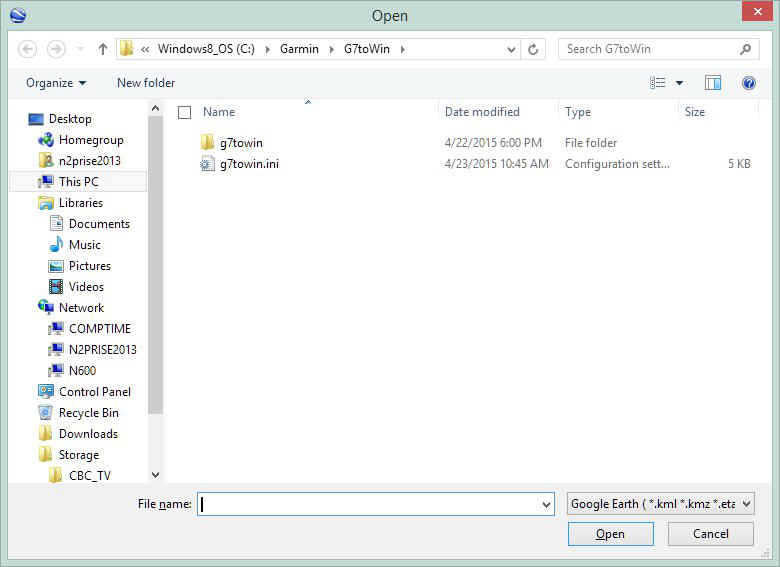
Next, you have to load the Garmin data base (.gdb) file into Google
Earth. When you click on "FILE" and "OPEN" in Google Earth, you
will see this window appear where you will browse to the folder where you stored your
UNZIPPED gdb files. You will not see them until you click on the "GPS files
(*.*) drop down button in the lower right corner of the window seen below. Notice
the drop down window shows the default file types for Google Earth (*kml .kmz.....).
When you click on it, the different file options appear showing their extension types for
each of the GPS file types. I use a Garmin GPS, so all you will get from me are
Garmin Database (.gdb) files for these Google Earth TOURS.
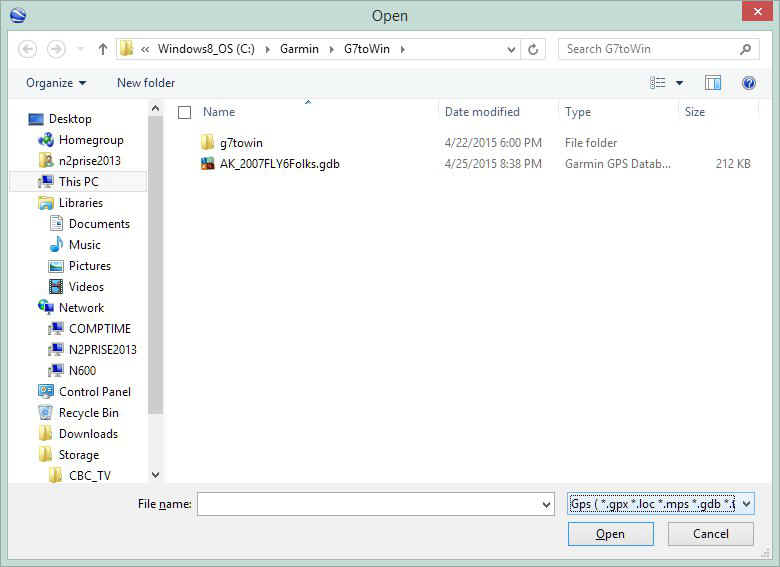
Select the GPS option and the file types will change as shown in this screen
capture. I use the old "G7toWin" program to translate from one file format
to another to edit my Garmin GPS Log files for this project. That process has been
filling my spare time since April 2015. You may have noticed how THIS page has
changed since then. The changes are due to how I have cleaned up all the GPS ground
tracks from the 2007 Alaska trip flown by Wendell and Terry as
seen on this web site. I am also adding more tour flights.
August 1, 2016: NEW! As I have created each tour and get the bugs worked out, I create a .KMZ version of that tour. The KMZ files can be loaded directly into Google Earth where they are unzipped in Google Earth and converted into KML files that are really what runs the tours on Google Earth.
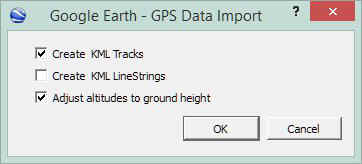 After you click the Open button seen above, this default window will open with the check marks next to "Create KML Tracks" and "Adjust altitudes to ground height." This is fine for the folks who go hiking or driving in the mountains as it puts the viewer at ground level as if you were driving a car, or walking a trail. |
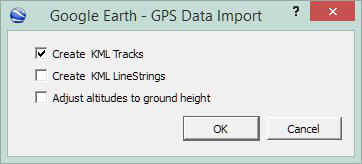 Since my web site is created for PILOTS and others who love everything about FLYING, we MUST uncheck the box next to "Adjust altitudes to ground height." Now we are ready to "Fly in Google Earth" to see the world from the pilot's seat following the GPS path from the real world flight. |
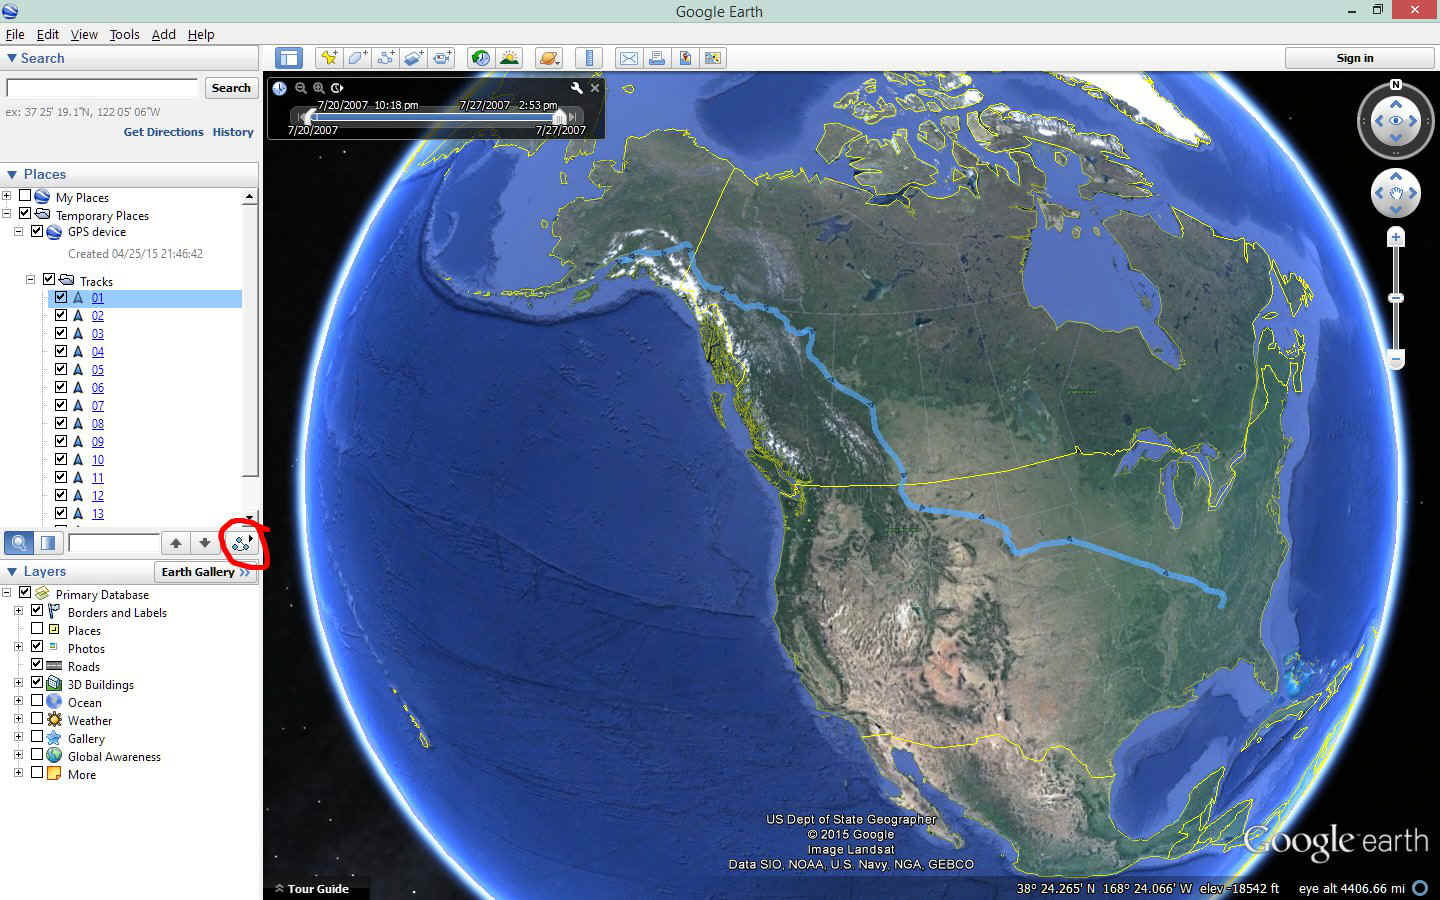
Here is the screen capture after I loaded the 2007 Alaska Garmin database file
into Google Earth. A GPS device has been added to the Sidebar menu under Temporary
Places. When you end your Google Earth session, the program will ask if you would
like to save the files. If you agree to that request, you will find the files ready
to use the next time you open Google Earth. After you have explored all the tracks,
you can delete the GPS Device and all sub-folders. Since you are keeping the
original Garmin database files, you can always reload them later to check out more details
along the flight path. One LOG file is created for each time you turn on your
"real world GPS" and the track ends when the GPS is turned off. Click on
the LOG file you want to "FLY" so it is highlighted in the Sidebar on the Google
Earth screen, it will appear on the map and the view will zoom out to show the complete
track in that file. Any LOG FILES that are not checked in the Sidebar will not be
visible on the map.
June 14, 2015: The Weather option box seen above can be clicked in the Sidebar to display clouds, radar, and other information from real time online weather sources. I use only the clouds option to give the sky a nice visual touch. NEW! When flying with Jerrie Mock, the SUN and ATMOSPHERE options get turned ON for the overnight flight from Bermuda to Santa Maria. Select View on the Google Earth Menu, then check the drop down menu for Sun and Atmosphere and turn them both on. One more thing is required to see the ocean turn black at night and give the stars their full treatment. Look at the Google Earth Options menu below and check the box to use Photorealistic atmosphere rendering. Be sure to look behind you from 120 to 145 minutes after departing Bermuda to see the sunset. When you let go of the compass button, the view comes back to the front and the stars are all that you can see as the ocean is blacked out as it should be. Look for the high cirrus clouds if you turned them on in the options. They are also visible after dark if you look closely at the stars.
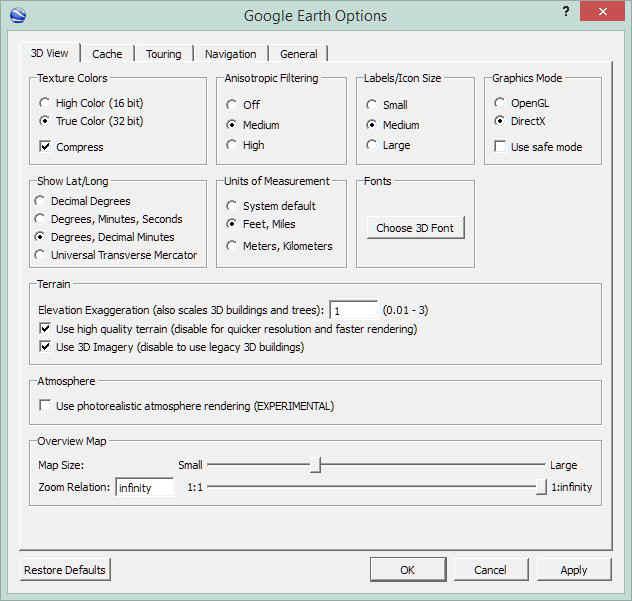
This is how the main Google Earth options screen looks when you click on the
"3D" View tab. If you click on the box for Atmosphere, you will see haze
on the horizon and a blue tint to the land below from high altitudes. I do a lot of
long distance flying above 10,000 feet. Try this option and you will see the
difference when this box is selected or not.
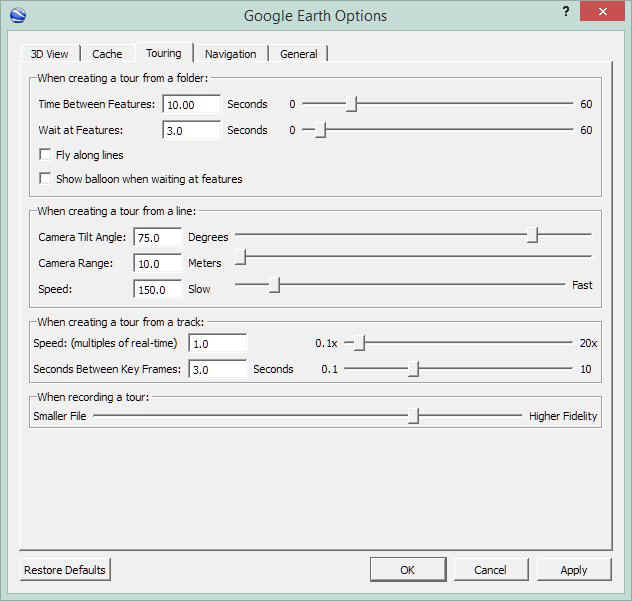
The other options to select before you fly are seen on the next screen below accessed by clicking "Tools" at the top of the Google Earth menu and selecting "Options" at the bottom of the drop-down window. Depending on the type of flying you are observing, you can change the "Camera Tilt Angle" value to look down or up high enough to see the horizon on your screen. When flying in the Canadian Rocky Mountains, I went as high as 85 degrees, but you should make your own selection. The maximum angle of 89 degrees is best for the Jerrie Mock flights over the oceans. You can see the stars move due to Earth rotation during the long night flights. Use fast forward about five clicks faster than real time speed for those overnight flights.
Any changes you make on these options pages only take effect when you stop the
flight you are currently running, then restart it by pressing the button marked in red
seen on the Sidebar. The option menu seen here is reached by selecting the
"Touring" tab at the top of the Google Earth Options window.
Here is the view of Google Earth when log file 01 has been selected on the
Sidebar menu. The blue line shows the complete GPS ground track for Garmin log file
01.
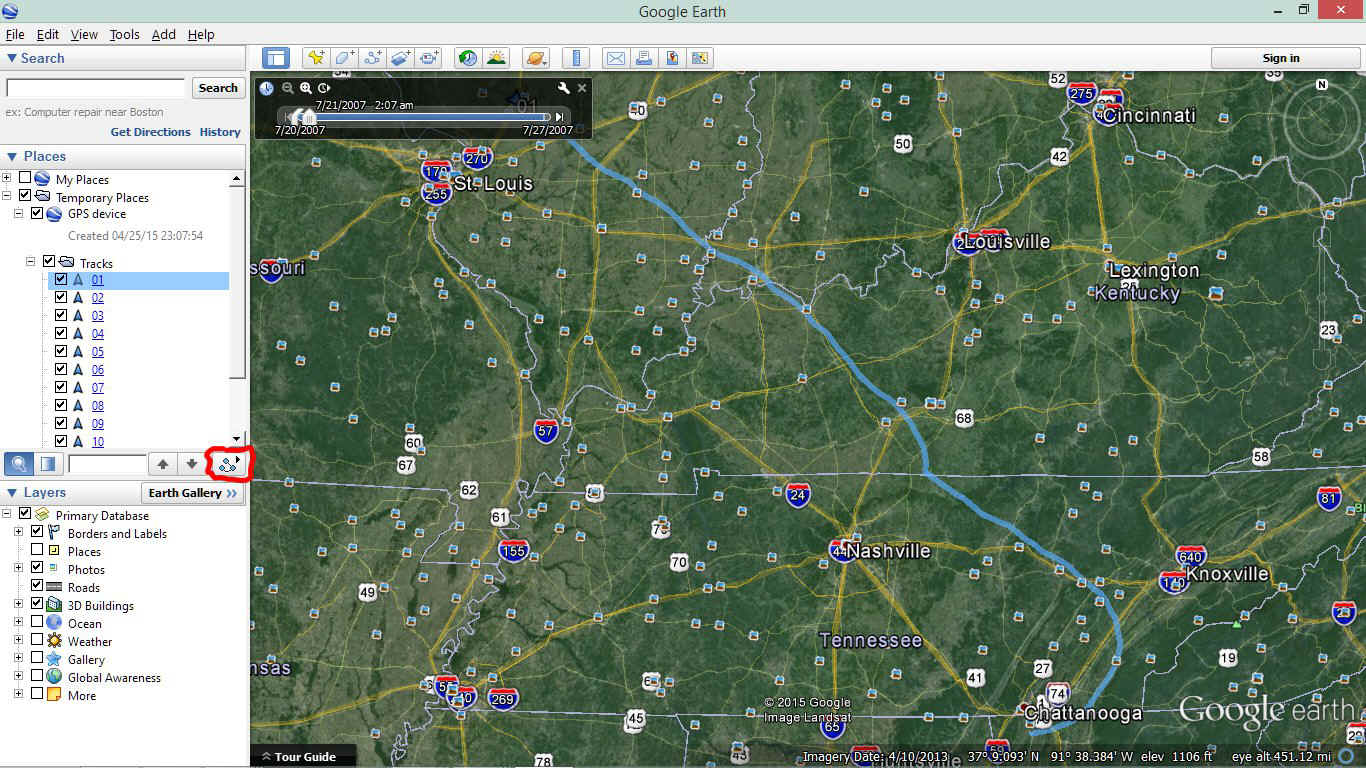
You are now ready to "Fly" the route segment by clicking the "Tour" button I have circled in RED on the screen capture above. Google Earth will then go to the beginning of the GPS track for the selected LOG file and begin retracing the flight path including altitude to give a view of the terrain below. The taxi and takeoff from Folks Field is the beginning of log file 01. The LOG file ends at the Litchfield, Illinois airport. The takeoff accelerates quickly as it begins after I have completed my engine runup tests. Yes, the start of the flight is a takeoff using my airplane GPS files. The flight to Alaska and the ground trip Wendell made near Anchorage completely filled his GPS memory. As a result, the GPS ground track from the beginning of his flight was over-written and lost. I created enough GPS ground track data points to follow the route to where the remaining original GPS data began in 2007. I made the log file names as short as possible to minimize the cursor label on the screen during the flight. This file ends at the fuel pump location after landing at the Litchfield Airport.
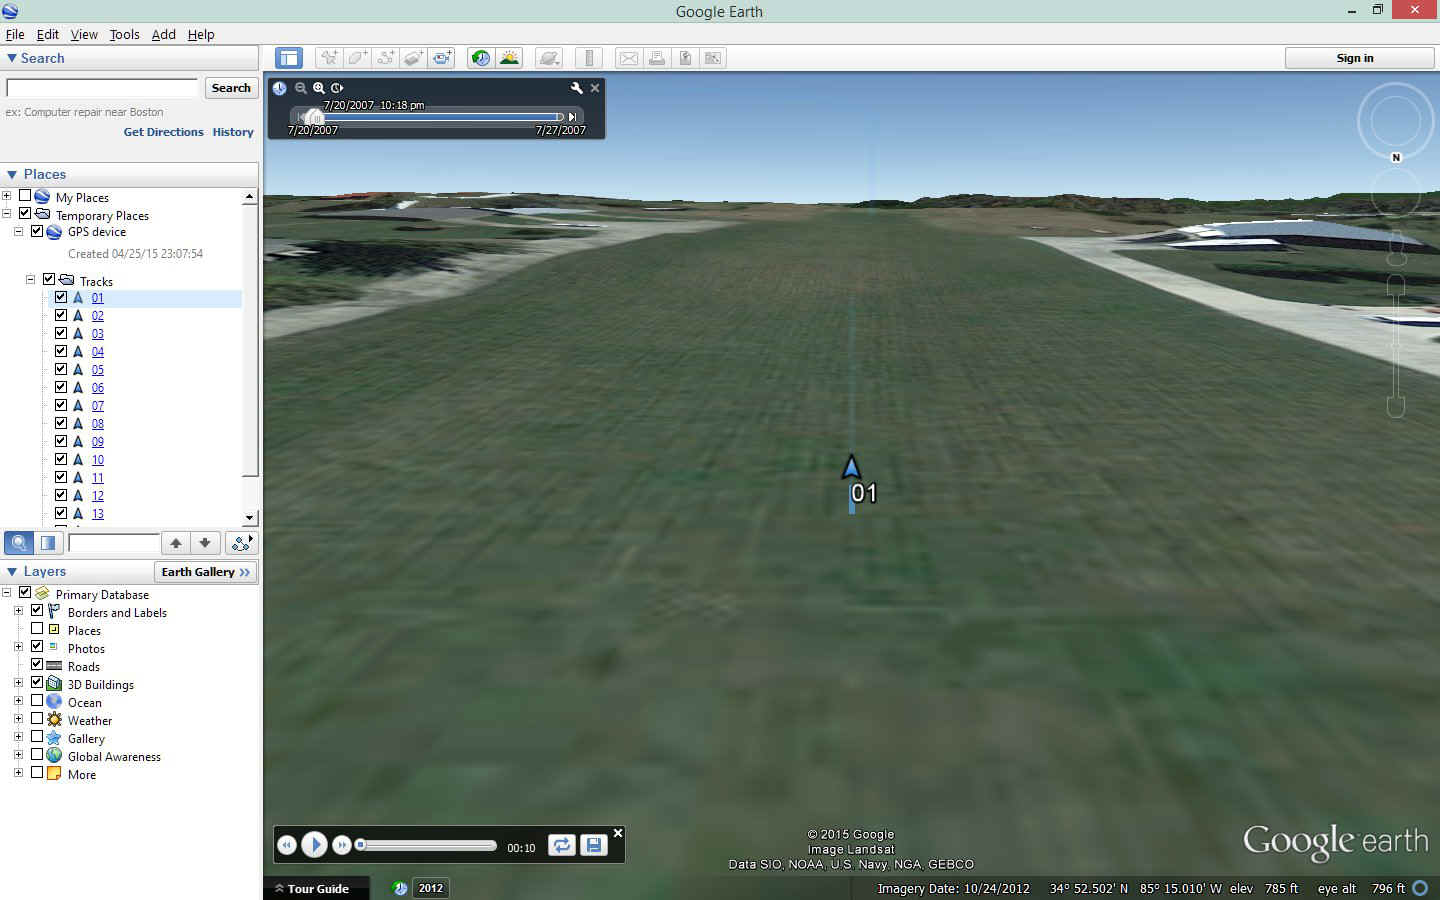
MAY 24, 2015 UPDATE: I found that it is possible to LOOK AROUND while a flight is in progress. Use the browser slider bar at the bottom of this window to look in the UPPER RIGHT CORNER of the screen image below. That transparent CIRCLE with the letter "N" at the bottom of the circle is a compass showing that the nose of my airplane is pointed SOUTH in this image. What is NEW to me is the fact than you can select the ANGLE of view around the current location by using the LEFT MOUSE BUTTON to do a "drag and drop" move while your mouse pointer is ON the letter "N" in that circle. IT does NOT matter whether the "airplane" is motionless or IN FLIGHT at ANY SPEED, CLICK and HOLD the button on the "N" and drag it around the compass to watch landscape passing by your virtual airplane at any viewing angle. When you let go of the mouse button, the view reverts to FORWARD. As on any magnetic compass, the letter N is for NORTH.
To get rid of the LOG FILE number and the ARROW when touring, just un-check the
box for the LOG file you are viewing. You will see I put titles on the LOG files for
the Jerrie Mock flights to identify each flight on screen. Un-checking the box gets
rid of the title along with the blue course line and arrow. You will want to do this
as you begin a tour flight.
GPS log file "02" begins at the Litchfield Airport and will taxi out from the ramp to the runup area of runway 36. It also shows the short delay during the engine runup test before entering the runway for departure. The flight ends at Mitchell, South Dakota. You can look all around at any point in the flight when you pause the flight and manually use the view controls in the upper right corner of the Google Earth screen. The Sidebar on the left can be turned off by clicking "View", then un-checking "Sidebar" in the drop-down menu that appears. This provides the maximum viewing area during the flight. You will need to turn the Sidebar back on manually to access all of the Google Earth features.
The black slider bar at the top left corner of the screen appears during the "flight." The black area behind that bar can be turned off using the X there. That slider bar remains in a transparent mode until you want to use it. If you want to display ALL the currently loaded GPS LOG FILES in ONE "Tracks" folder, the two "tabs" on the upper left slider can be moved to the opposite ends of the slider bar. This is what happens when you load new GPS file. The initial view is always high above the Earth showing the tracks from end-to-end on the screen. This works best when viewing the "whole Earth" as seen in the second screen capture near the top of this page. The default mode is to only show the ONE active LOG track after it is selected in the Sidebar menu. The pause and rewind slider in the bottom left corner of the screen only appears when you hover your mouse over it. It will hide sometime after beginning the "tour" flight. Clicking any where on the view screen will pause the flight until you click on the triangle start button on the slider bar at the bottom left of the screen.
Looking at my screen capture above, move YOUR browser slider bar at the bottom of your screen to the right to see the right side of the image. Elevation (elev) above sea level is the height of the ground below the blue cursor, with the eye altitude (eye alt) showing the aircraft altitude above sea level from the GPS data point being displayed at the time.
The next things to adjust are on the options window for Google Earth.
Click Tools then select Options and the window below will appear. Select the
"Touring" tab and play with the various settings to get the kind of action and
view angle you desire. I prefer the Camera Tilt Angle at 70 degrees to show the
horizon near the top of the viewing window. The default angle is 60 degrees.
The default speed is 150 with the camera range at 100 meters. This means your view
point in Google Earth is 100 meters "Behind" your airplane GPS waypoint
location. The minimum range is 10 meters with that slider all the way to the LEFT.
This gives a more realistic view during aircraft ground operation, takeoff, and
landing. The speed you "move" over the terrain is set by Speed (multiples
of real-time). With the default value of 6, this amounts to 900 MPH when the
aircraft is in cruising flight. At this setting, a true 1-hour flight would only
take 10 minutes to view. I prefer the setting be Speed be set at ONE times real time
for takeoff and landing, and it works out well when flying LOW. Any changes made on
the options screen only take effect the next time you push the "Tour" button
seen inside the RED circle in the photo up above. During the flight, the lower left
slider bar has a pause / play button just like on a DVD or music player. Right next
to that button, there are a couple of "fast forward" buttons that change the
time multiplier factor in steps of ONE per click. You can even make the view run
backwards. This comes in handy to slow down or speed up the views when desired.
For some extra fun, click on the 3D View tab and click the Atmosphere box. You will see haze in the distance that is not seen when that box is NOT checked. Sometimes you may see cirrus clouds above. I learned this option when I was preparing the views I used in the Jerrie Mock flight pages. You can learn more about viewing GPS Tracks in Google Earth by CLICKING HERE.
I think the explanation above of how to do GPS flying in Google Earth is correct, but I am sure we will find something I missed as we go through this new adventure. Now I need to deliver those Garmin Data Base files. CLICK HERE to download the updated ZIP FILE that contains all the file names below. UNZIP the file and save it to your hard drive, then load the".gdb" file into Google Earth as described above on this page.
May 3, 2015: I have updated the Garmin GPS tracks to put all the flights in a single ZIP file. The table below will turn into one file with a number of ACTIVE LOG sections that will be the flight segments. All the LOG FILES will load with just one step from Google Earth. Click on the log files listed below to see that flight segment.
| Wendell and Terry's Alaska Trip - July 2007 | |
| FILE DESCRIPTION | FILE NAME |
| Day 1 -- Flight from Tennessee to Litchfield, Illinois
(FUEL) The GPS track from Folks Field now in log file 01. Day 1 -- Log file 02 from Litchfield, Illinois to Mitchell, South Dakota. |
TWO GPS LOG FILES |
| Day 2 -- Mitchell, South Dakota to Miles City, Montana via Mount Rushmore in log file 03. Day 2 -- Miles City log 04 departs Miles City airport and continues to Great Falls, Montana. |
TWO GPS LOG FILES |
| Day 3 -- Great Falls, Montana to Lethbridge,
Alberta, Canada is log file 05 flying along the Eastern side of the US Rocky Mountains. Clear Canadian Customs and get Fuel. Day 3 -- Lethbridge over Calgary to Whitecourt, Alberta, Canada (LOG 06, FUEL) Day 3 -- Whitecourt, Alberta to Dawson Creek, British Columbia (LOG 07, FUEL) |
THREE GPS LOG FILES |
| Day 4 -- Dawson Creek to Fort Nelson, British Columbia (LOG 08, FUEL) Day 4 -- Fort Nelson to Watson Lake, Yukon Territory (LOG 09, FUEL) Day 4 -- Watson Lake to Whitehorse, Yukon Territory (LOG 10, FUEL) |
THREE GPS LOG FILES Set the Camera Tilt Angle to 80 degrees and Camera Range to 10 meters for the flights from Fort Nelson to Watson Lake and Whitehorse. These flight segments fly through the NORTH END of the Canadian Rocky Mountain Range extending from Montana. |
| Day 5 -- Whitehorse to Northway, Alaska (LOG 11) Clear US Customs (NO FUEL ADDED) Day 5 -- Northway to Gulkana, Alaska (LOG 12, FUEL) Day 5 -- Gulkana to Anchorage, Alaska arrival at Elmendorf Air Force Base with holding pattern. (LOG 13) |
THREE GPS LOG FILES |
| Day 6 -- No flights today, only local sight seeing and the
formal presentation of the keys to the new owner of N8438S. |
NO GPS LOG FILES |
| Day 7 -- Anchorage to Kenai, Alaska on a SALMON fishing
trip. A check ride for the new owner (LOG 14) Day 7 -- Return trip to Anchorage (LOG 15) |
TWO GPS LOG FILES |
To get the most out of this Google Earth experience of flying to Alaska, you may wish to review the matching web pages and photo descriptions from the journey as you fly the GPS LOG files in Google Earth..
As for the procedure to view GPS flights, I have many files stored on my old IBM computer that published this web site before I got the new computer with Windows 8.1. I will create more GPS file download tables like the one above for major flights from the past. I am looking forward to this process as much as I am sure you are. We can all get a look at the scenery that has passed under my airplane. The nice thing about this process is to be able to PAUSE during the flight with the slider bar in the bottom left corner of the Google Earth screen. You can then use the regular view controls in the upper right corner of the screen to tilt, pan, and zoom to look all around from that location in the flight. This feature will give us all a chance to compare the actual camera snapshots with the latest images from Google Earth.
In some remote areas where aerial photography is not available, the lower resolution of satellite images in Google Earth will be very evident when flying low over the terrain. This will be easily seen when an adjacent area comes into view that is an aerial photo after flying over satellite images. You can also see clouds in some of the aerial photos that will cling to the terrain elevations. This is the case when looking at the flight segment from Fort Nelson to Watson Lake. The clouds were part of the aerial photos used in that location. You will also notice the guys take a few quick side steps to see something of interest off to one side of the intended route. Terry was a helicopter pilot if Viet Nam and likes flying low or near a side of a mountain ridge in a narrow valley. You will see this type of flying as a part of LOG 09 on the way to Watson Lake. The snow-covered mountains seen in the web page photos were real when they flew this route in 2007. Watch the Google Earth imagery date when you fly these areas.
When the Camera Range is set to 10 meters, the cursor will jump around a bit as this is the accuracy of the GPS resolution from one data point to the next in the GPS log file. UN-CHECK the box to the left of the LOG FILE name in the Sidebar menu to hide the cursor and file name. If you see a "hard landing" at any airport where the airplane bounces, this is from the difference in GPS reported altitude in the log file as compared to the Google Earth ground elevation at that location. It occurs when the GPS altitude is lower than the runway elevation. I found this issue when I "landed" at Key Field located at Meridian, Mississippi. I had to edit my LOG file to stay at or slightly above the Google Earth reported elevation for the runway and taxiway areas.
| May 24, 2015: I have created a NEW WEB PAGE for access to all the Garmin GPS data files for Google Earth Tour "FLIGHTS". The ZIP file for Alaska was the first file that can be downloaded to your hard drive. Unzip the Garmin GPS track file (.gdb) to be loaded into Google Earth as described above. The Alaska file now has my trip to the LOE5 RV Fly-in, and a first day flight of Jerrie Mock from Columbus, Ohio to Bermuda from her historic 1964 flight around the world. |
ENJOY THE FLIGHTS via GOOGLE EARTH TOURS!
| Other Travels Menu | MAIN MENU |