CATV Bench Sweep Setup Page 2
Now that we have talked about what can be done wrong, look at figure 2 to see how to minimize the errors.  In this setup the amplifier has been forced to "see" an improved impedance match as if it had long coaxial cable spans connected to the trunk input and output ports.  This setup is good for response testing only.

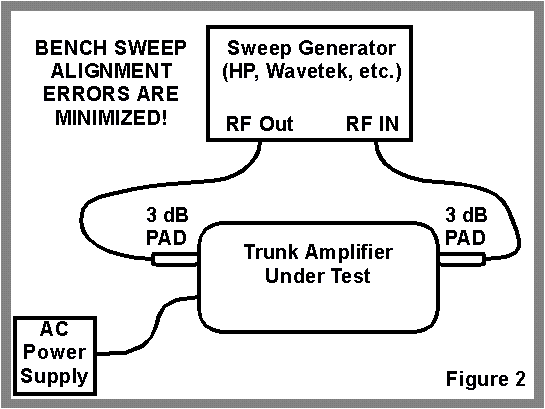
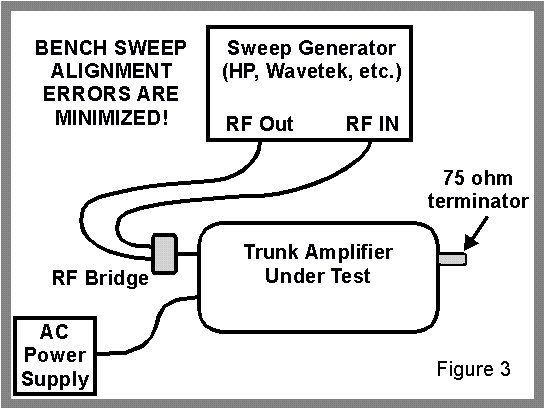
Testing the input or output impedance match of the RF modules in the housing requires an RF bridge and the removal of the inline pads from the test setup.  If the test cables were of high quality, the pads would not be needed anyway.  Figure 3 depicts the typical setup when using an RF bridge to test return loss / impedance match.  The HP8711 network analyzer used here at QRF has the return loss bridge function built into the RF output port of the machine itself.  The digital signal processing eliminates the cable errors of the high quality cables which are provided by HP with the unit. 

bnchswp2.gif (12491 bytes)

bnchswp3.gif (13230 bytes)

The cables between the RF bridge and the RF output (source) and RF input (detector) of the sweep generator should be the short, high-quality cables used in the figure 2 setup, but without the inline pads (if they were needed before).   Depending on the internal design, the loss of the RF bridge itself could be as high as 12 or 15 dB.  This loss of the bridge will be evident with no connection to the "test" port (or "unknown") of the RF bridge.  This 12 or 15 dB loss becomes the ZERO dB return loss reference point for the impedance match testing.   When a precision 75-ohm RF terminator is attached to the test port of the bridge, the return loss should show at least 30 dB.  This means that 30 dB will be added to the insertion loss that previously measured 12 or 15 dB for the particular bridge in use.   A good general purpose terminator should provide 26 dB return loss.  By the way, if the bridge is well made, the open test port insertion loss and the shorted test port condition should be the same -- the 12 or 15 dB through loss for the RF bridge itself.
Now that we have RF bridge theory out of the way, test your amplifier to see that the impedance match on the housing with module installed is 16 dB or better.  Make sure the bridge is connected to the housing with a double male F-71 connector or the shortest possible piece of cable.  Turn off the power to the module and notice the difference in the return loss.  Install an equalizer in the chassis or trunk module as required and notice the difference in return loss compared to the housing and module only.  Change the gain settings see any changes.  Always test at operational gain.       (Click for Page 3)